
YOUR SITE NAME
Your site subtitle


YOUR SITE NAME
Linux and AWS
HyperFluxCMS no Linux e Amazon Web Services
See how to install HyperFluxCMS on Linux and make the necessary configurations on the system. For this guide, the Amazon Web Services virtual server service (EC2) will be used as a reference

Installation Guide (Part 1): HyperfluxCMS on AWS EC2 (Ubuntu Linux)
Step 1: Create the EC2 instance and the access key
Step 2: Send HyperFluxCMS to the server
Option A: Via Windows (WinSCP + PuTTY)
Option B: Via Linux or macOS (Native Terminal)
Step 3: Prepare the server and unzip the application
Step 4: Configure the service in the background (Systemd)
Step 5: Configure Nginx as a Reverse Proxy
Optimization: Enable 1 GB Swap Memory on Ubuntu
Step 1: Create and activate the 1 GB Swap file
Step 2: Make Swap permanent after reboots
Step 3: Validate the operation
Free Domain (DuckDNS) and HTTPS (SSL)
Step 1: Create and point the free subdomain on DuckDNS
Step 2: Configure the domain in Nginx
Step 3: Install Certbot and activate the free HTTPS certificate
Step 4: Test secure access and manage future maintenance
How to Update HyperfluxCMS Without Losing Data
Step 1: Send the update package and open the terminal
Option A: Via Windows (WinSCP + PuTTY)
Option B: Via Linux or macOS (Native Terminal)
Step 2: Make a preventive backup before updating
Installation Guide (Part 1): HyperfluxCMS on AWS EC2 (Ubuntu Linux)
This guide presents the complete step-by-step to host HyperfluxCMS (.NET 8 Self-Contained with embedded SQLite database) on a free tier Amazon EC2 instance using Ubuntu Linux and Nginx.
The first part, creating and configuring the EC2 instance, is exclusive to AWS. The following steps also apply to installing HyperFluxCMS on other Linux internet service providers.
Prerequisites
To follow this guide, you will need:
- An active AWS account. It can even be a "free tier" account
- The HyperfluxCMS binary package compiled for linux-x64 compressed into a .zip file (e.g.: hyperfluxcms-linux-x64.zip).
- On Windows: WinSCP and PuTTY installed.
- On Linux or macOS: System default terminal (with native ssh and scp).
WinSCP can be downloaded at https://www.winscp.net
PuTTY can be downloaded at https://www.chiark.greenend.org.uk/~sgtatham/putty/latest.html/
Step 1: Create the EC2 instance and the access key
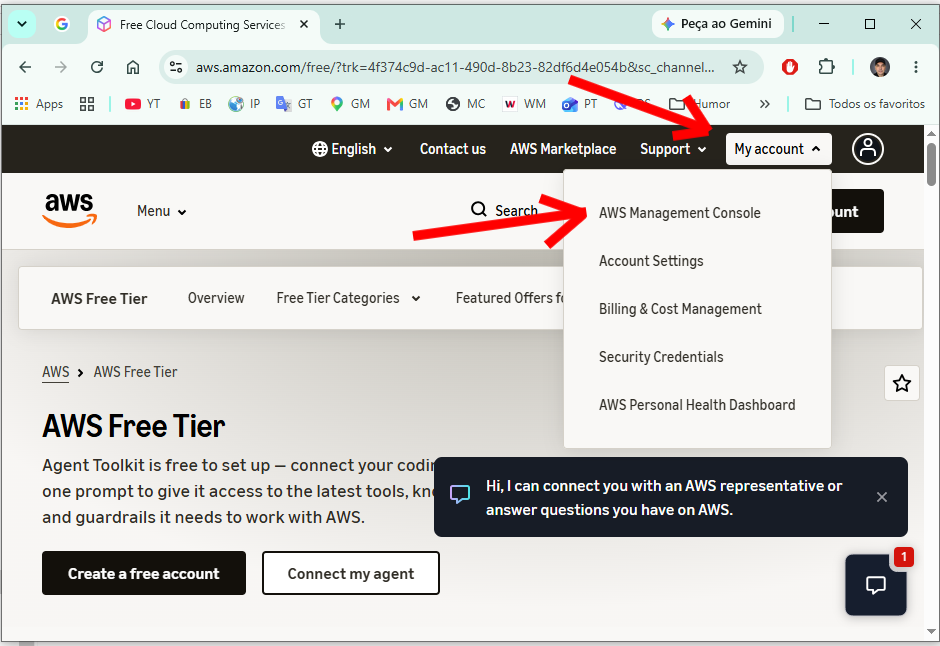
Log in to the AWS Console, check your region in the upper right corner (e.g.: North Virginia / us-east-1 or São Paulo / sa-east-1),
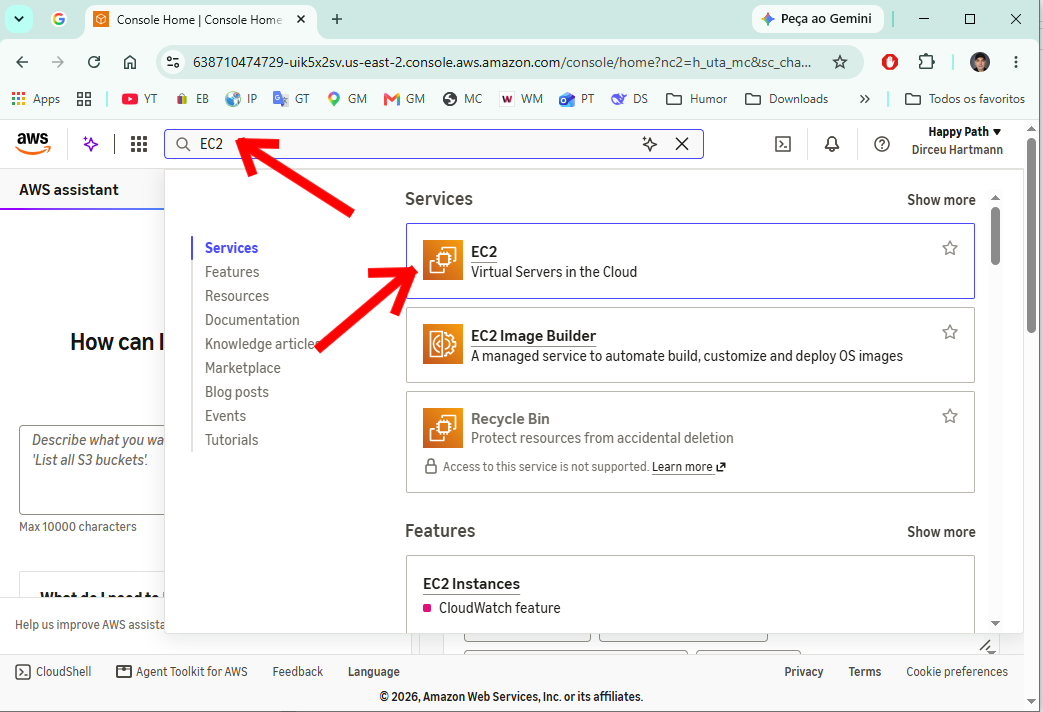
Access the EC2 dashboard. Search for EC2 in the top bar and click on the option.
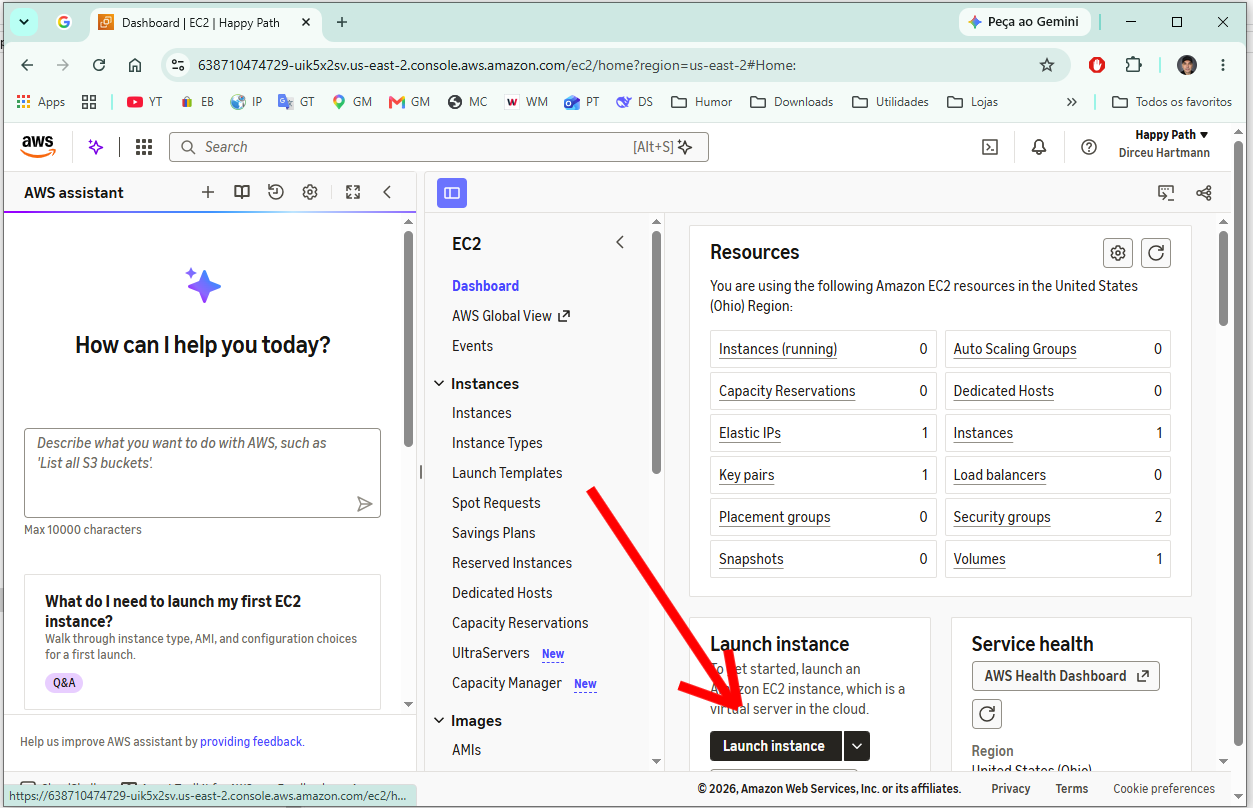
Click on Launch instance.
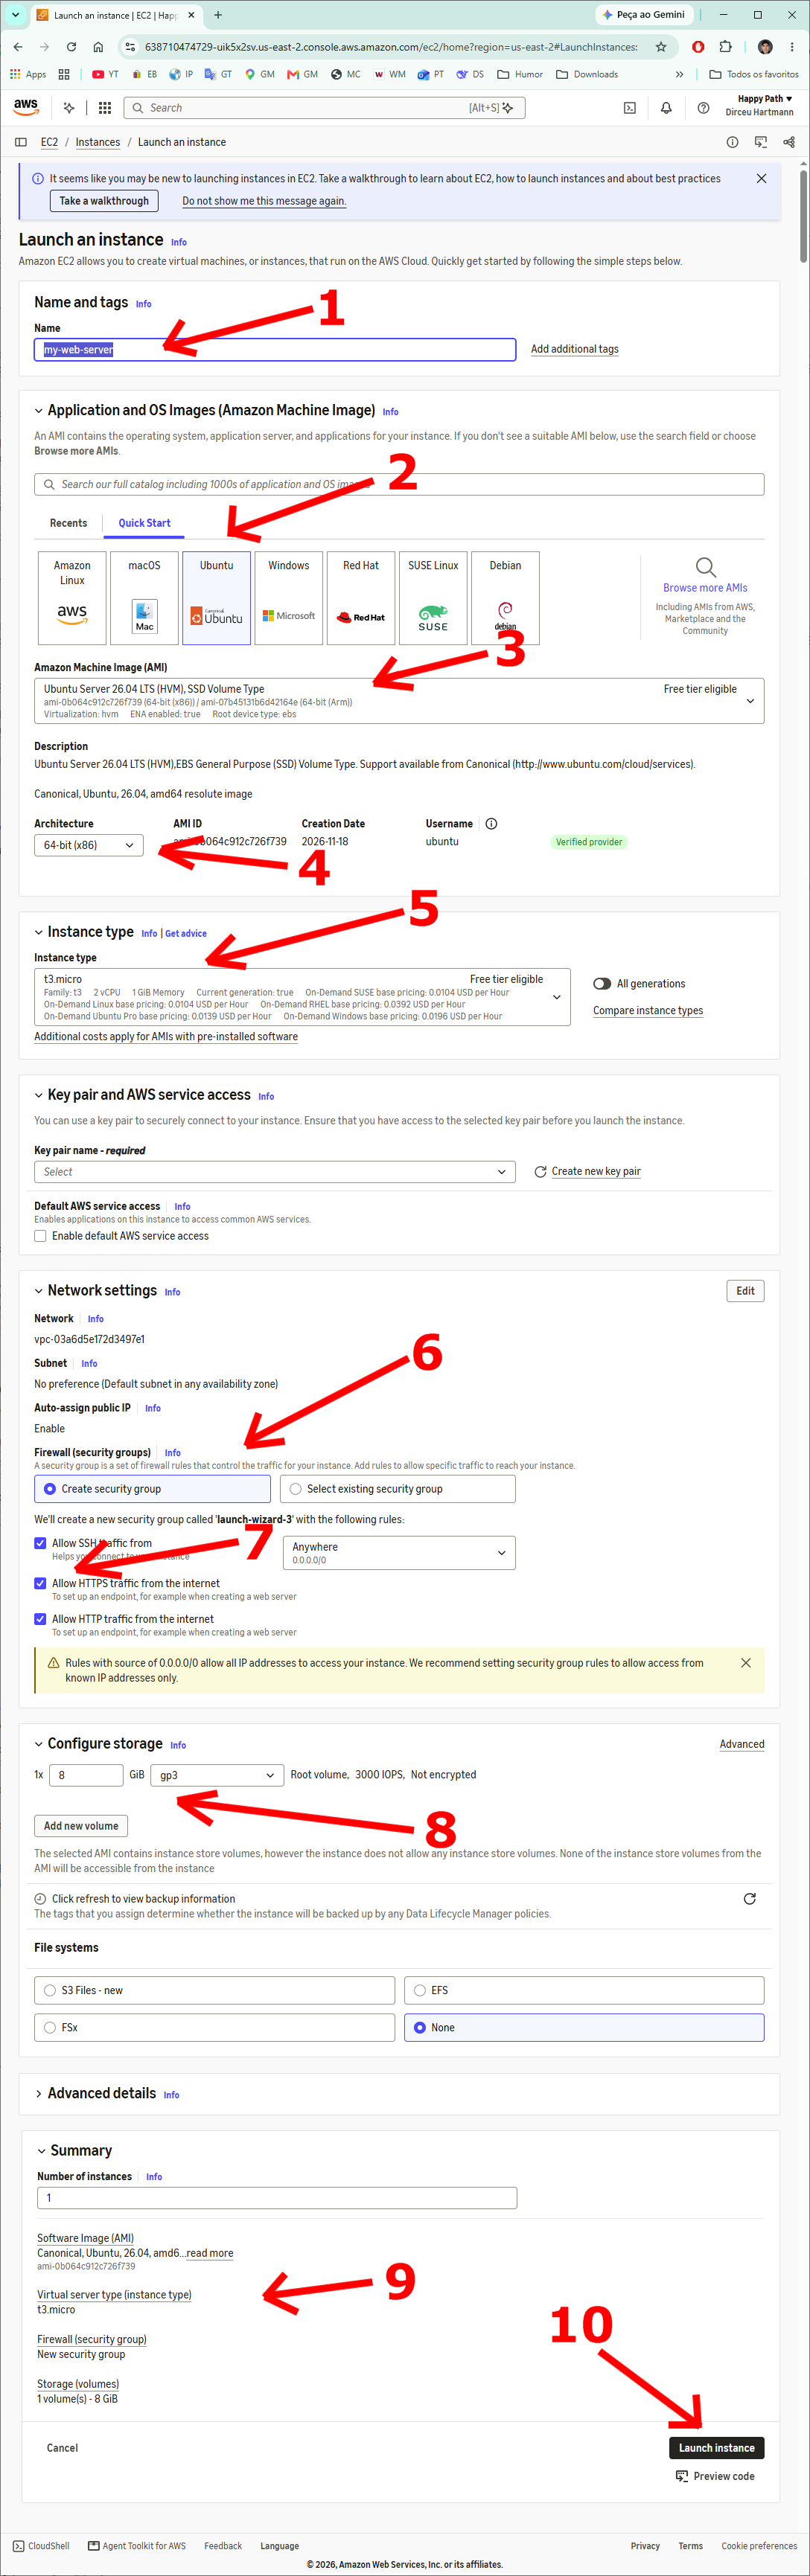
Define the instance name. In this example, we will use "my-web-server", but you can choose another name if you prefer.
Choose the Operating System. In the Application and OS Images section, select Ubuntu.
Review the version. Choose an updated version compatible with the HyperFluxCMS binaries you downloaded.
Choose the platform compatible with the HyperFluxCMS binaries you downloaded. In this guide we will use the 64-bit architecture (x86).
Choose the Instance Type, suitable for your plan. If you are using the Free Tier plan, select t3.micro, if it is available, or t2.micro, if t3.micro is not available for your plan or region.
Configure the Firewall (Security Group). In the Network settings section, leave Create security group checked.
Enable the three options:
- Allow SSH traffic from (Anywhere).
- Allow HTTPS traffic from the internet.
- Allow HTTP traffic from the internet.
Configure the storage. The default size of 8GB is more than enough for Ubuntu, HyperFluxCMS, additional tools, and the image data of a medium-sized site.
Review the settings
Click on Launch instance.
The console will say that you have not yet created the instance access keys. Create them now.
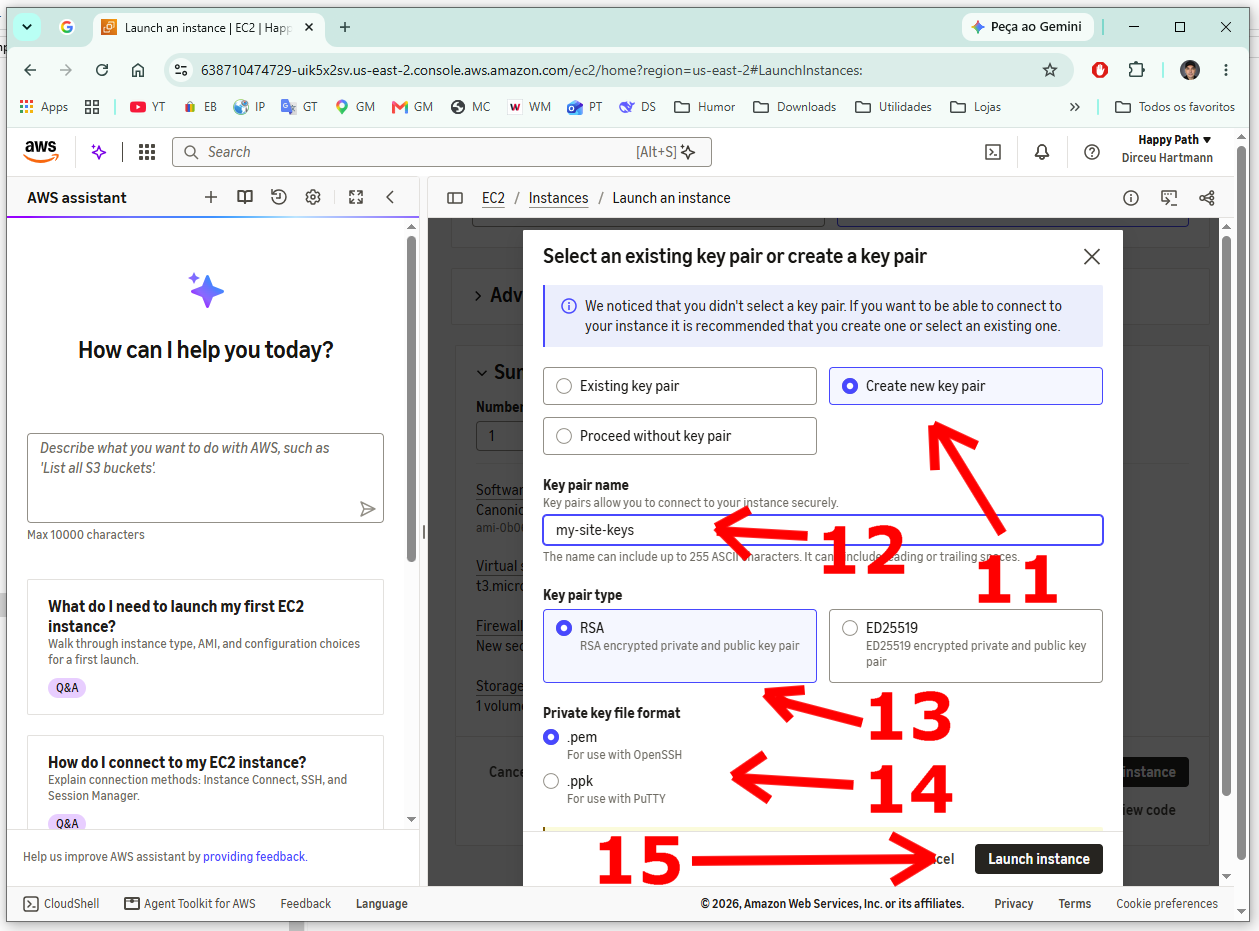
Create a new key pair: Click on "Create new key pair"
Give a name to your key pair
Select RSA
Select the type: ".pem" if you are going to use the native FTP system of Linux or iOS. Select ".ppk" if you are going to use WinSCP on Windows; You can also select ".pem" on Windows, since WinSCP can convert the .pem format to .ppk.
Click on Launch instance.
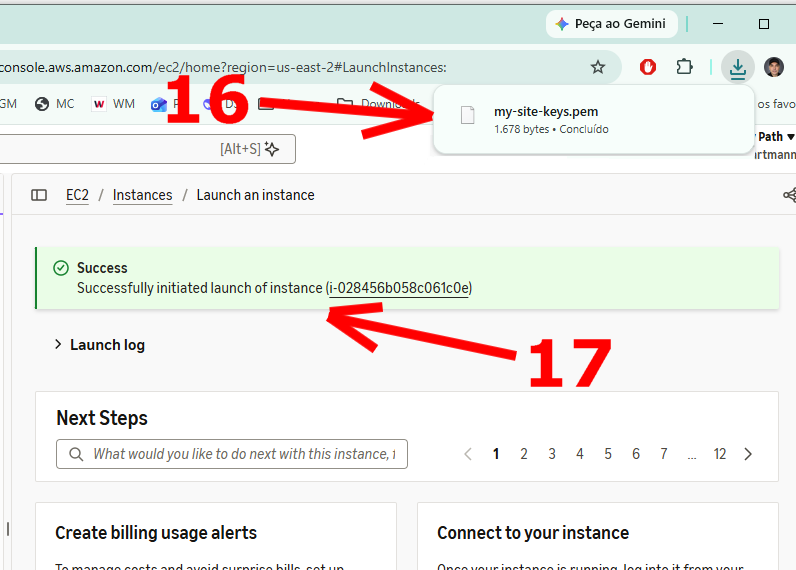
The key file will be downloaded automatically.
The instance will run. Wait a few moments until the servers have completed initialization. Click on the ID of the created instance (in the image, the code i-028456...)
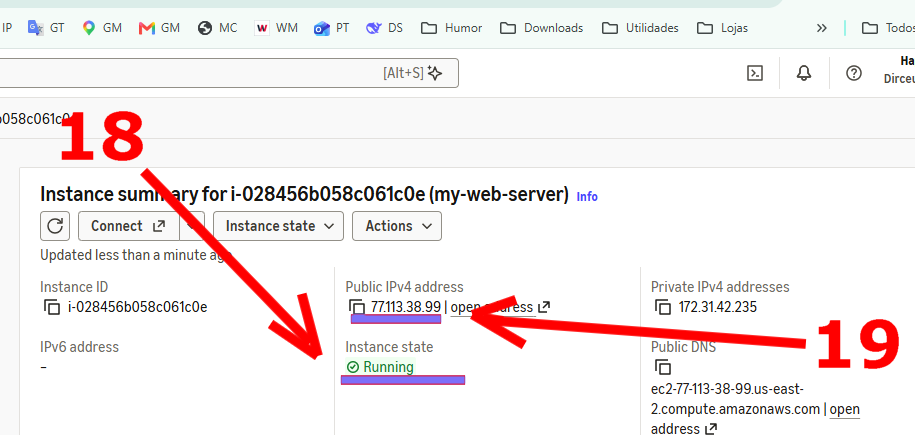
Wait for the Instance State to change to Running and copy the Public IPv4 address.
Copy the public IP address of the instance. You will need it later.
Your EC2 instance is ready for use.
Step 2: Send HyperFluxCMS to the server
Follow the instructions corresponding to your operating system:
Option A: Via Windows (WinSCP + PuTTY)
Open WinSCP and start a new login
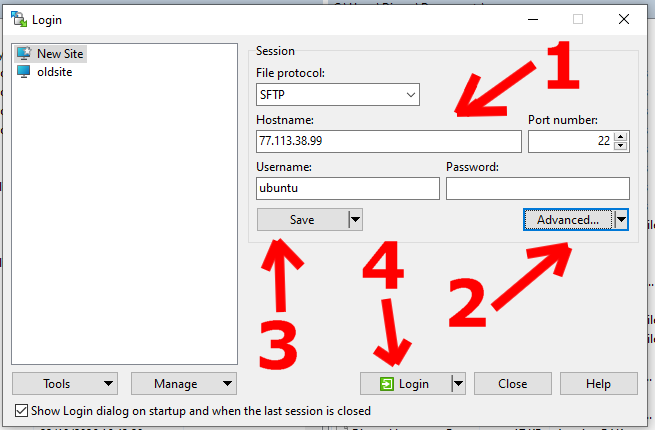
Fill in the data
- File protocol: SFTP
- Host name: Paste the Public IPv4 address of your AWS instance.
- Port number: 22
- User name: ubuntu
Select the keys. Click on Advanced... In SSH -> Authentication, select the key file generated earlier (.ppk or .pem). If you generated it in .pem format, WinSCP will ask to convert it to PPK. Follow the steps described in WinSCP to generate the .ppk file.
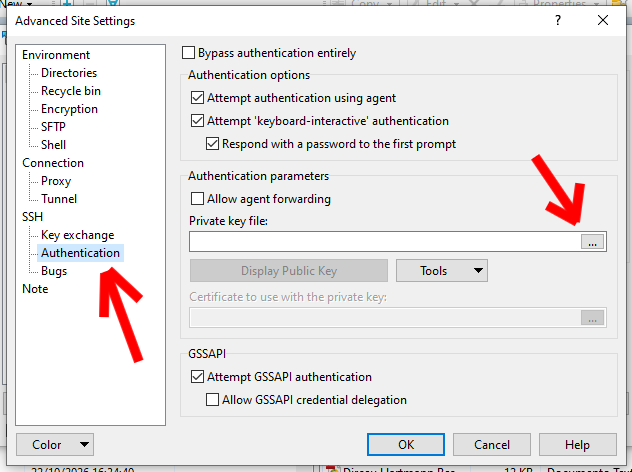
Click on Save
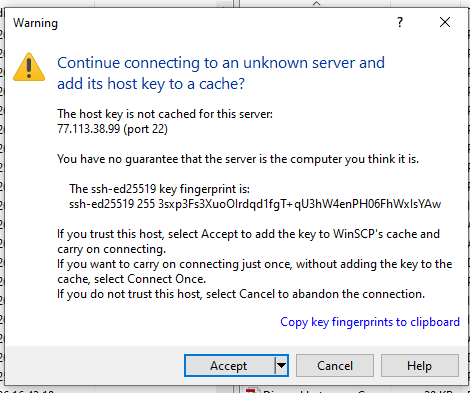
Click on Login. A warning message may appear. Accept and continue.
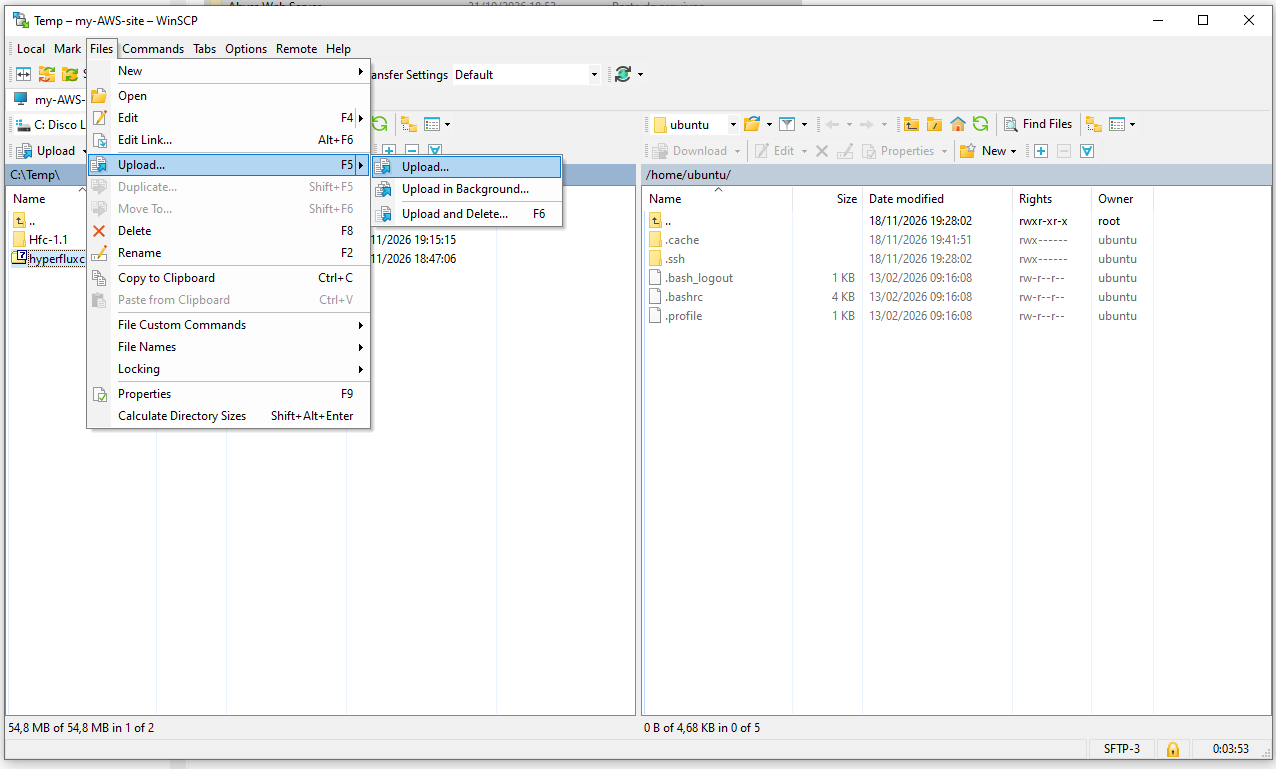
Upload the .zip file. You will be connected. From the left panel, browse your computer to locate the .zip file with the latest HyperFluxCMS binaries you downloaded. In the right panel, navigate to /home/ubuntu. Select the .zip file and upload it (or press F5).
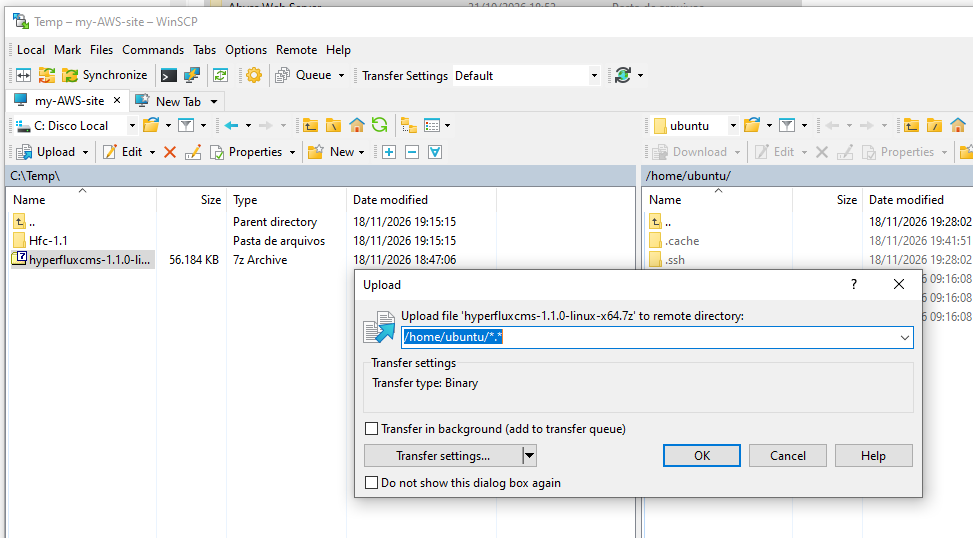
Confirm the upload
Wait until the file upload finishes
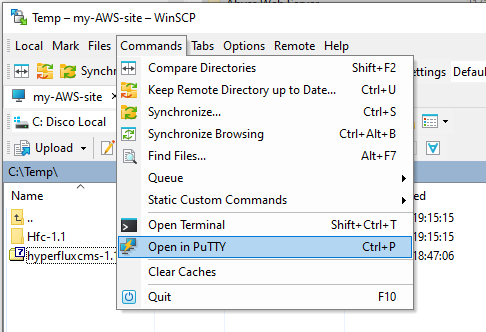
Open the terminal. Press Ctrl + P (or access Commands > Open in PuTTY) to open the server's SSH terminal.
Option B: Via Linux or macOS (Native Terminal)
Open the terminal in the folder where you saved your .pem key and the .zip package.
Restrict the permissions of the private key (required for SSH to accept the connection):
chmod 400 chave-hyperflux.pem
Send the .zip file to the server using scp (replace YOUR-PUBLIC-IP with the IPv4 of the instance):
scp -i chave-hyperflux.pem hyperfluxcms-linux-x64.zip ubuntu@YOUR-PUBLIC-IP:home/ubuntu
Connect to the server's SSH terminal:
ssh -i chave-hyperflux.pem ubuntu@YOUR-PUBLIC-IP
Step 3: Prepare the server and unzip the application
Once connected to the Ubuntu server's SSH terminal, execute the steps below:
Update the system and install Nginx (web server) and Unzip (to extract the files):
sudo apt update && sudo apt install -y nginx unzip
Create the official directory of the application and extract the contents of the .zip directly there (replace hyperfluxcms-linux-x64.zip with the exact name of your file, if different):
sudo mkdir -p /var/www/hyperfluxcms
sudo unzip /home/ubuntu/hyperfluxcms-linux-x64.zip -d /var/www/hyperfluxcms/
Apply the execution permissions on the binary and set the www-data user as the owner of the folder (necessary for HyperfluxCMS to be able to automatically create the data/sqlite.db folder and save media in wwwroot):
sudo chmod +x /var/www/hyperfluxcms/HyperfluxCMS
sudo chown -R www-data:www-data /var/www/hyperfluxcms
(Optional) Remove the .zip file from the temporary folder to keep the server clean:
rm /home/ubuntu/hyperfluxcms-linux-x64.zip
Step 4: Configure the service in the background (Systemd)
For HyperfluxCMS to run continuously and restart by itself if the server is rebooted, create a service on Linux:
Create and open the service configuration file:
sudo nano /etc/systemd/system/hyperfluxcms.service
Paste the content below into the editor:
[Unit]
Description=HyperfluxCMS .NET 8 Web App
[Service]
WorkingDirectory=/var/www/hyperfluxcms
ExecStart=/var/www/hyperfluxcms/HyperfluxCMS
Restart=always
RestartSec=10
KillSignal=SIGINT
SyslogIdentifier=hyperfluxcms
User=www-data
Environment=ASPNETCORE_ENVIRONMENT=Production
Environment=ASPNETCORE_URLS=http://localhost:5000
[Install]
WantedBy=multi-user.target
Save and close the editor: press Ctrl + O, confirm with Enter and exit with Ctrl + X.
Enable and start the service:
sudo systemctl daemon-reload
sudo systemctl enable --now hyperfluxcms
sudo systemctl status hyperfluxcms
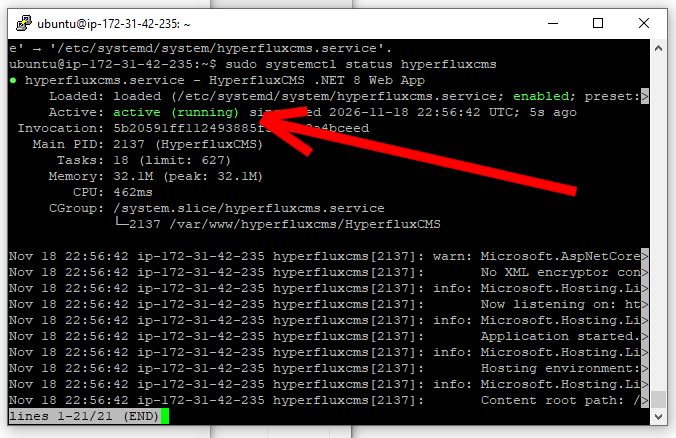
Check if active (running) appears in green. Press q to exit the status screen.
Step 5: Configure Nginx as a Reverse Proxy
Now configure Nginx to receive external traffic from port 80 and forward it to the .NET application running on port 5000:
Remove the default configuration of Nginx and create a new clean one:
sudo rm /etc/nginx/sites-available/default
sudo nano /etc/nginx/sites-available/default
Paste the configuration below:
server {
    listen 80 default_server;
    listen [::]:80 default_server;
    server_name _;

    client_max_body_size 50M;

    location / {
        proxy_pass         http://localhost:5000;
        proxy_http_version 1.1;
        proxy_set_header   Upgrade $http_upgrade;
        proxy_set_header   Connection keep-alive;
        proxy_set_header   Host $host;
        proxy_cache_bypass $http_upgrade;
        proxy_set_header   X-Forwarded-For $proxy_add_x_forwarded_for;
        proxy_set_header   X-Forwarded-Proto $scheme;
    }
}
Save and close the editor (Ctrl + O, Enter, Ctrl + X).
Validate the syntax and reload Nginx:
sudo nginx -t && sudo systemctl reload nginx
Step 6: Test access
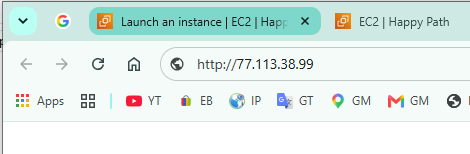
Open a browser window (preferably in private mode to avoid automatic redirection to HTTPS).
Type in the address bar http://YOUR-AWS-PUBLIC-IP (replacing it with the IPv4 copied in Step 1).
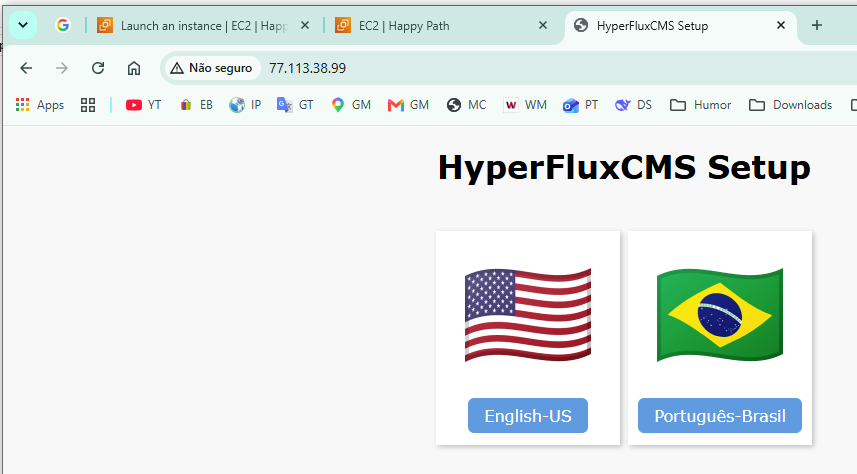
On the first request, HyperfluxCMS will show the initial installation screen. Follow the steps described in Installing HyperFluxCMS
Access the administrative panel and do an image upload test to confirm that writing to the wwwroot folder is operating normally.
Optimization: Enable 1 GB Swap Memory on Ubuntu
Amazon EC2 free instances (such as t3.micro and t2.micro) have 1 GB of physical RAM memory and come without Swap memory configured by default. Creating a 1 GB Swap file on disk works as a free safety net: if the server goes through a spike in accesses or heavy image processing, Linux uses this disk space to avoid the unexpected shutdown of HyperfluxCMS due to lack of memory.
Cost Information (AWS Free Tier)
The service is free. The Swap file uses 1 GB of the hard drive (EBS) already allocated to the instance (default of 8 GB), remaining well below the 30 GB free limit of the AWS free tier and without generating extra charges.
Step 1: Create and activate the 1 GB Swap file
Connect to the server via SSH terminal (PuTTY or Ctrl + P key in WinSCP).
Execute the sequence of commands below to allocate the file, protect its permissions and activate it as virtual memory:
sudo fallocate -l 1G \swapfile
sudo chmod 600 \swapfile
sudo mkswap \swapfile
sudo swapon \swapfile
Step 2: Make Swap permanent after reboots
By default, Linux deactivates manually created Swap files when the server is restarted. To ensure that the system activates Swap automatically whenever it boots, register it in the system disk table (/etc/fstab):
Add the configuration to the end of the /etc/fstab file:
echo '/swapfile none swap sw 0 0' | sudo tee -a /etc/fstab
Step 3: Validate the operation
Check if the Swap memory is active and recognized by the operating system:
free -h
Check the result displayed in the terminal. The Swap: line should show 1.0Gi in the total column, confirming that the protection is active:

Free Domain (DuckDNS) and HTTPS (SSL)
This complementary guide shows how to replace access via numeric IP address with a free friendly domain using DuckDNS and activate HTTPS encryption (security padlock) for free using Certbot (Let's Encrypt).
Prerequisites
- HyperfluxCMS already installed and accessible via HTTP through the public IP of the EC2 instance (according to Part 1).
- Access to the server's SSH terminal (via PuTTY or WinSCP).
- Port 443 (HTTPS) open in the instance's Security Group on AWS.
Step 1: Create and point the free subdomain on DuckDNS
Access DuckDNS. Open duckdns.org in the browser and log in using a Google, GitHub, Reddit or Twitter/X account.
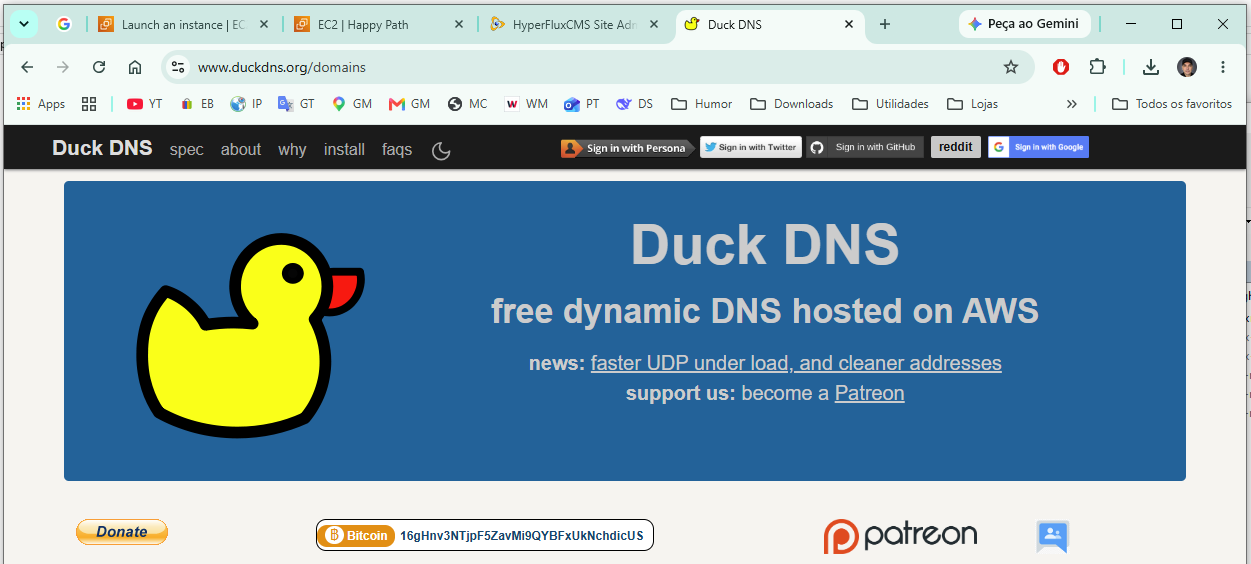
Register your subdomain. In the sub domain field, type the desired name for the project (e.g.: test-mysite) and click on add domain.

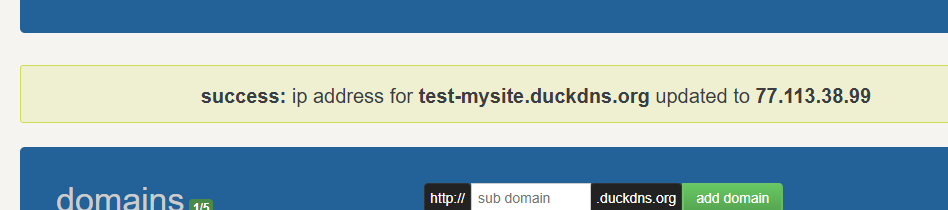
Link the AWS IP. In the domain list just below, erase the IP automatically filled in the current ip field, paste the Public IPv4 address of your EC2 instance and click on update ip.
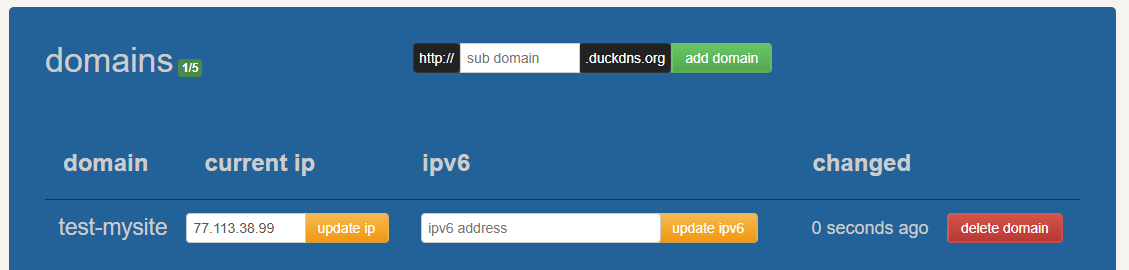
Note the complete address. Your free domain will be something like test-mysite.duckdns.org.
Step 2: Configure the domain in Nginx
The Nginx web server needs to know your domain name to respond correctly to requests and allow SSL certificate validation.
Connect to the server via SSH terminal (PuTTY) and open the Nginx configuration file:
sudo nano /etc/nginx/sites-available/default
Locate the line server_name ; and replace the with your complete DuckDNS address (replace the example below with the exact name you created):
server_name test-mysyte.duckdns.org;
Save and close the editor (Ctrl + O, confirm with Enter and exit with Ctrl + X).
Test the syntax and reload Nginx:
sudo nginx -t && sudo systemctl reload nginx
Step 3: Install Certbot and activate the free HTTPS certificate
Certbot generates the free digital certificate from the Let's Encrypt certificate authority, automatically configures Nginx to accept secure connections on port 443 and activates automatic redirection from HTTP to HTTPS.
Install Certbot and the integration module with Nginx:
sudo apt update && sudo apt install -y certbot python3-certbot-nginx
Execute the certificate issuance command (replace hyperfluxcms.duckdns.org with your real domain):
sudo certbot --nginx -d hyperfluxcms.duckdns.org
Answer the questions in the terminal:
- E-mail: Enter a valid e-mail (used only for critical renewal alerts) and press Enter.
- Terms of service: Type Y (or A) and press Enter.
- E-mail sharing with EFF: Type N and press Enter.
When the message Successfully deployed certificate appears, HTTPS will already be active. Certbot also automatically creates a scheduled task in Ubuntu that renews the certificate before expiration (every 90 days), without requiring manual intervention.
Step 4: Test secure access and manage future maintenance
Validate in the browser. Access your site (for example, https://test-mysite.duckdns.org) and confirm that HyperfluxCMS loads normally with the padlock icon (secure connection) in the address bar.
Attention!
When restarting or stopping the instance on AWS:
- If you only restart the operating system (sudo reboot or Reboot on AWS), the public IP does not change and the site continues to work normally.
- If you completely shut down the instance (Stop) and turn it on again in the AWS console, AWS will assign a new public IP. In this case, simply access the DuckDNS panel, paste the new IP in the current ip field and click on update ip to reestablish access through the same HTTPS address.
How to Update HyperfluxCMS Without Losing Data
This guide presents the safe procedure to update the HyperfluxCMS binaries on your AWS EC2 instance (or other Linux servers accessible via SSH), ensuring that the data/sqlite.db database and the files uploaded to the wwwroot/gallery gallery remain intact.
Prerequisites
- The new HyperfluxCMS update package compiled for linux-x64 and compressed into a .zip file (e.g.: hyperfluxcms-1.1-linux-x64.zip).
- Make sure the .zip does not contain any test sqlite.db file inside the data folder, so as not to overwrite the production database.
Step 1: Send the update package and open the terminal
Option A: Via Windows (WinSCP + PuTTY)
Open WinSCP and connect to the server using the previously saved profile.
Upload the hyperfluxcms-update.zip file (the other file name) from your computer (left side) to /home/ubuntu on the server (right side).
Press Ctrl + P to open the SSH terminal.
Option B: Via Linux or macOS (Native Terminal)
Send the update package to /home/ubuntu via scp:
scp -i chave-hyperflux.pem hyperfluxcms-update.zip ubuntu@YOUR-PUBLIC-IP:home/ubuntu
Connect to the server via SSH:
ssh -i chave-hyperflux.pem ubuntu@YOUR-PUBLIC-IP
Step 2: Make a preventive backup before updating
Before replacing any application file, make a quick safety copy of the current folder (including the SQLite database and the image gallery):
Stop the application service to avoid writes to the database during the backup and update:
sudo systemctl stop hyperfluxcms
Create a compressed copy of the current folder in /home/ubuntu with the date and time of the moment:
sudo tar -czf /home/ubuntu/backup_pre_update_$(date +%Y-%m-%d_%H-%M).tar.gz -C /var/www hyperfluxcms
Step 3: Extract the update and apply permissions
The unzip -o command extracts the new binaries overwriting only the system files that were updated, keeping the data/sqlite.db file and the files saved in wwwroot/gallery intact:
Unzip the new package over the existing installation (replace hyperfluxcms-update.zip with the exact name of your file):
sudo unzip -o /home/ubuntu/hyperfluxcms-update.zip -d /var/www/hyperfluxcms/
Reapply the execution permissions on the binary and ensure that the www-data user continues to be the owner of all new files:
sudo chmod +x /var/www/hyperfluxcms/HyperfluxCMS
sudo chown -R www-data:www-data /var/www/hyperfluxcms
Remove the .zip file sent to keep the directory clean:
rm /home/ubuntu/hyperfluxcms-update.zip
Step 4: Restart the service and validate
Start the HyperfluxCMS service again and check the status:
sudo systemctl start hyperfluxcms
sudo systemctl status hyperfluxcms
Check if the status appears as active (running) in green and press q to exit.
Open your domain https://
Note:
If something does not go as expected, you can restore the previous state at any time by stopping the service, deleting the var/www/hyperfluxcms folder and extracting the backup_pre_update_...tar.gz file created in Step 2).